

How to set up an iPhone mailbox
If you have an email address with a custom email domain, it can be a complicated process to connect your email to your preferred mail account. To help you connect your email address to iPhone Mail you can follow this post to get you up and running as soon as possible!
You can select your prefered tutorial method here!
How To Connect Your Email Account
We can help you in 4 simple steps. This tutorial is specific to iPhone Mail, so, please see our other tutorials for connecting your email to Apple or Outlook. If you prefer a video tutorial, use the button above to take you to our quick, helpful video tutorial.
Step 1 - Navigate iPhone Mail Settings
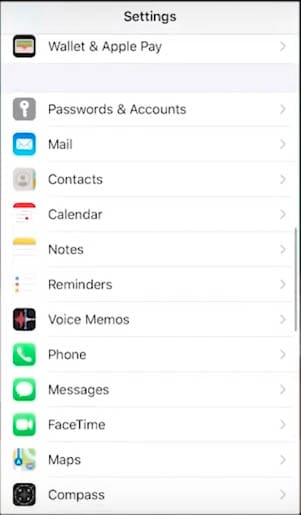
To start setting up your iPhone mail, open Settings app and go to > Passwords & Accounts. Then click > Add Account > Other > Add Mail Account.
Make sure you are using a custom email domain and not an email from a provider such as Apple, google or Microsoft. See below for examples of unique custom email domains and provider email domains.
 Custom Email Domain
Your email ends with a custom and unique domain name I.E.
- @yourwebsitedomainname
- @youremaildomainname
 Provider Email Domain
Your email ends with one of the following options.
- @gmail
- @yahoo
- @outlook
- @icloud
- @hotmail
Step 2 - Enter Account Details
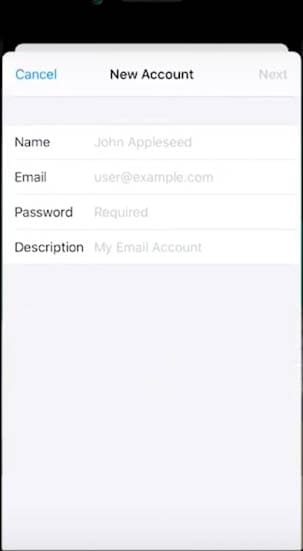
Next, you will be asked to add your email details. This includes ‘Username’, ‘Email’, ‘Password’ and ‘Description’. Description is the only section that is optional, however it can be helpful to add a description if you use a lot of mailboxes and need some information to keep track of your emails. Once you have filled out your details, click the button labelled ‘Next’ to continue.
Step 3 - Enter Incoming & Outgoing Server Settings
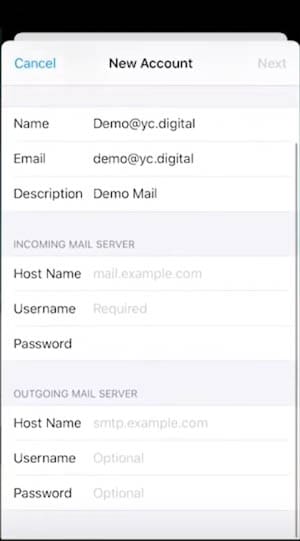
Next, you will need to enter the IMAP and SMTP details for your email account to connect it to the correct hosting providers. These details will help ensure you both receive and send mail successfully, so it is important to double-check that the details are correct. If your emails are hosted with Yellow Cherry, you can continue following the set up. If you are with another hosting provider, you may need to ask your provider for the correct details to connect your email.
To start, the three fields,’Host Name’, ‘Username’ and ‘Password’, will need to be completed for both the IMAP and SMTP fields. In IMAP and in SMTP, the details for ‘Username’ and ‘Password’ will be your email address and email password, respectfully.
- For the IMAP ‘Host Name’, you will want to enter the following – imap.stackmail.com
- For the SMTP ‘Host Name’, you will want to enter the following – smtp.stackmail.com
Once all the details are entered, simply click the button labelled ‘Next’ to continue.
If you did not receive the option to enter this information. then continue to step 4.
Step 4 - Check Your iPhone Mail
Now that your account is connected you can exit out of the settings app and open the Apple Mail app. It is always good to check a couple of details. First, we recommend to check and ensure all your mail is appearing in your mailbox as expected. This can sometimes take a few hours to sync your account. If your mailbox is still not operating correctly after a couple of hours, try reconnecting your mail account again by signing out and then back in.
A good secondary test to ensure your mailbox is working is to send a test email to a colleague and check if they received the email successfully.
If your mailbox has synced and you can send emails, then your mailbox is correct successfully and you can freely send and receive emails.
Video Tutorial to Connect Your Email Account
If you prefer a video tutorial to take you through the steps, please use the video below for help.
If you are still struggling to connect your email account after following the steps above, please get in touch with our team. We would be happy to help you with any issue you may be having.